Max: Hey Zoe, I’m trying to figure out how to set up a data retention policy in Microsoft Dataverse. Can you walk me through the critical steps and things to watch out for?
Zoe: Absolutely, Max. Let’s start with the prerequisites. Before you set up a data retention policy, you need to enable the table for long-term retention and determine the Dataverse views for policy criteria.

Max: Got it. How do I enable a table for long-term retention?
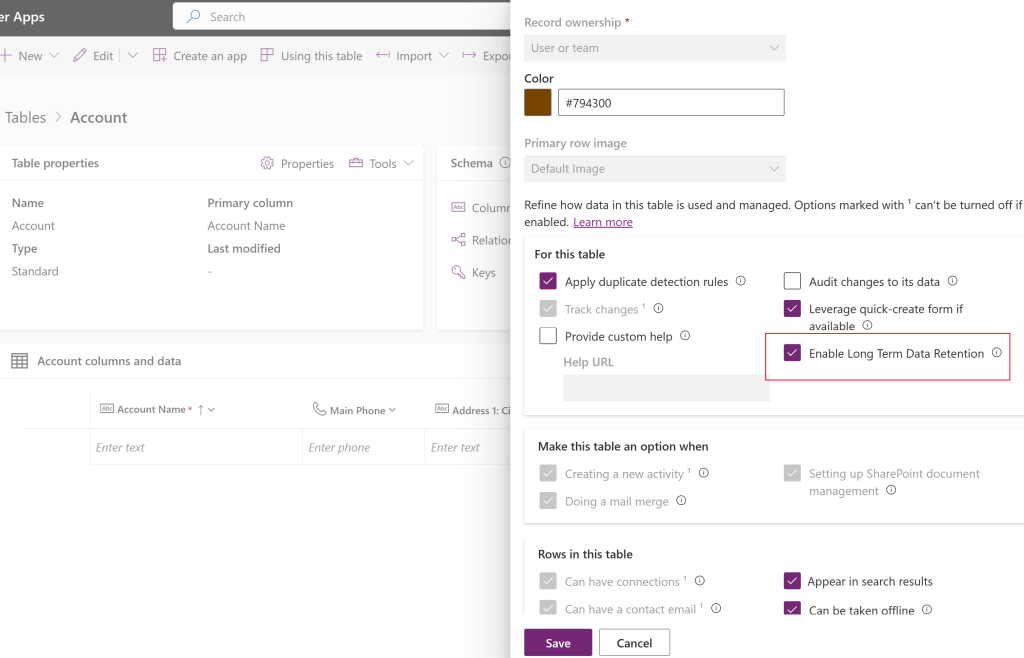
Zoe: Sign into Power Apps, go to Tables, and open the table you want. Under Properties in the command bar, expand Advanced options, and select Enable long-term retention. Once saved, this applies to the parent table and all its child tables.
Max: What if I don’t want some child tables to be included?
Zoe: If you enable a parent table for retention, all its child tables are automatically included. You can’t disable retention for the child tables unless you first disable it for the parent. However, this behavior is different when enabling through a solution import process—child tables aren’t automatically included in that case.
Max: Understood. What about setting up the views for policy criteria?
Zoe: You need to create a Dataverse view that specifies which rows should be marked for retention. It’s a good practice to test your view with a TOP N statement to ensure it returns the expected results, especially if you’re dealing with large data sets.
Max: Can you give an example?
Zoe: Sure! For example, if you create a view to select all closed cases from 2015, you might add a TOP 10 statement to test and confirm the results. When the retention policy runs, it will include rows from both the parent and child tables based on this view.
Max: That makes sense. So, how do I actually set up the retention policy?
Zoe: First, ensure you have the Power Platform administrator role. Sign into Power Apps and select Retention policies from the left navigation pane. Click New retention policy and fill in the properties, including the table, policy name, criteria (view), start date, and frequency (Once, Daily, Weekly, Monthly, or Yearly). Then, save the policy.

Max: Is there anything I should be particularly careful about when setting up these policies?
Zoe: Definitely. Once data is marked for long-term retention, it can’t be moved back to the active data store. Also, keep in mind that running a retention policy makes API requests that count towards your plan’s limits.
Max: What are the limitations and important facts I need to consider?
Zoe: There are a few key points:
- The retention policy won’t start in environments with administration mode enabled.
- All associated child activities, emails, and attachments are retained as a set with the parent table.
- Long-term retention policies can’t be set for tables where bulk delete isn’t supported.
- Retention policies have a low priority and can take 72-96 hours to complete.
- If multiple policies run on tables with common child tables, the policies are processed sequentially to prevent conflicts.
Max: Are there any known issues?
Zoe: Yes, if a parent table has many child tables or if the tables are large, you might encounter timeouts. This is common in cascade relationships with many tables. To mitigate this, enable a few child tables first, then go back and enable the parent table.
Max: Thanks, Zoe! This really clarifies things for me. I feel more confident about setting up and managing data retention policies now.
Zoe: Glad to help, Max! Remember, proper setup and testing are key to ensuring your data retention policies work smoothly. Let me know if you have any more questions!
