We have all seen it happen.
A customer replies with their credit card number in an email. Or worse someone pastes their full Identity Number into a support form. And now it’s sitting in your system, completely visible to a frontline agent who probably shouldn’t see it.
Until now, the best you could do was create custom columns, lock down access, or set up field-level security. But that still left you guessing or relying on user behavior.
That’s changing, with the new Masking Rules feature (currently in preview) in the Power Platform admin center.
This is data masking done right natively, securely, and smartly.
🤔 What is Data Masking?
Data masking, also called de-identification or obfuscation, is like putting a privacy screen over sensitive fields. It hides sensitive data from most users, replacing it with something like ####-##-6789, while still letting authorized users retrieve the real value, one record at a time.
It’s not about encryption or access control. It’s about keeping human eyes away from sensitive info unless they really need to see it.
🧪 Real-world Example: Masking in Action
Say your customer writes:
“My SSN is 123-45-6789 and my card is 4567 8912 3456 7891.”
With masking rules in place, your support agent would see:
“My SSN is ###-##-6789 and my card is #”
Boom. Sensitive info hidden. Panic avoided.
🛠️ How It Works: Creating a Masking Rule
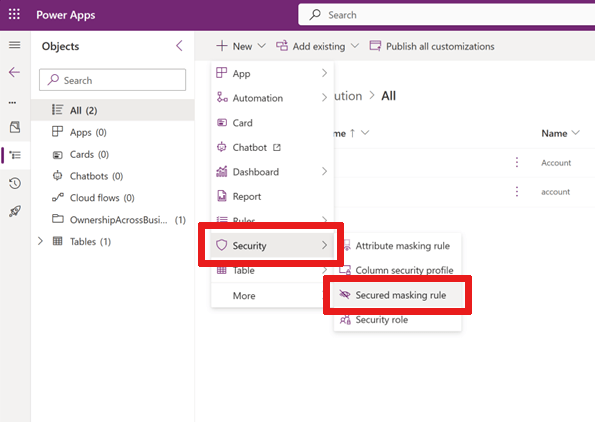
- Head to Power Apps, create or open a solution.
- Under Security, choose Secured Masking Rule.
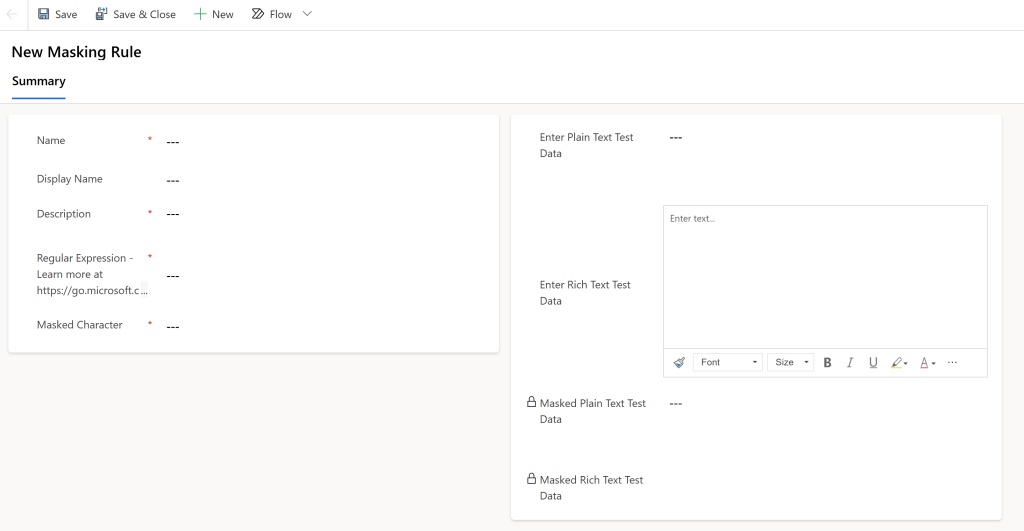
- Define your rule:
- Add a name (like
new_MaskSSN) - Use a regular expression to detect the pattern
- Choose a mask character (
#,*, etc.) - Test your rule with sample data (plain text or rich text)
- Add a name (like
Want to mask emails, SSNs, or credit cards?
Try a pattern like this:
\S+@\S+\.\S+ | \d{3}-\d{2}-\d{4} | [25][1-7][0-9]{14}Masking happens when a record is retrieved, so even if the original value is saved, users only see the masked version unless they have special permissions.
🔐 Who Can See the Real Data?
Only users with Read unmasked permission can view unmasked data, and even then, only one record at a time (unless they’re privileged backend services).
You can assign these permissions via Column Security Profiles:
| Access Type | Behavior |
|---|---|
| Read | View masked data |
| Read unmasked | View actual data (1 record or all records) |
| Update/Create | Save unmasked data—system will mask on refresh |
So your support staff sees ****, but your fraud detection app sees the full value. Everyone wins.
🧩 Where Masking Rules Work

Yes, even Copilot sees the masked version unless you allow it otherwise.
And if you’re working with Rich Text fields (like email body), you can still mask content, but you’ll need to be mindful of HTML wrappers. You can query raw field values using Web API for testing.
🔍 Want to See Unmasked Data (if you’re allowed)?
If you’re authorized, you can append ?UnMaskedData=true to your Web API query.
Example:
https://<org>/api/data/v9.1/contacts(<recordid>)?$select=ssnfield&UnMaskedData=trueJust remember: this feature is in preview, and reading unmasked values on forms isn’t supported yet. It’s coming, but for now, masked is the default.
📋 Where to Manage and Monitor Masking
- View all rules: Search for the
MaskingRuletable in Power Apps. - View all columns with rules: Search for
AttributeMaskingRule. - Apply to columns: Go to your column settings, enable security, and pick your masking rule.
⚠️ What’s Not Supported (Yet)
- Editing unmasked values directly without manual entry
- Viewing embedded images in rich text, images get masked too
This isn’t just a niche security feature, it’s a practical, high-impact upgrade for any organization handling sensitive customer data. Whether you’re in banking, healthcare, government, or just… reality, masking rules add a new layer of “do the right thing by default.”
The best part? It’s low-code, easy to configure, and already sitting inside your Power Platform.
So go ahead, mask it like you mean it.
