Power Automate allows you to send in-app notifications to users in Dynamics 365 model-driven apps. Here are the steps to follow:
- Create a new flow: Open the Power Automate designer and create a new flow.
- Add the “Create a new record” action: Select the “Create a new record” action and choose the “Notifications” entity.
- Configure the notification message: In the “Create a new record” action, specify the recipient of the notification by setting the “Owner” field to the user or team that should receive the notification. Then, set the notification message in the “Title” and “Description” fields.
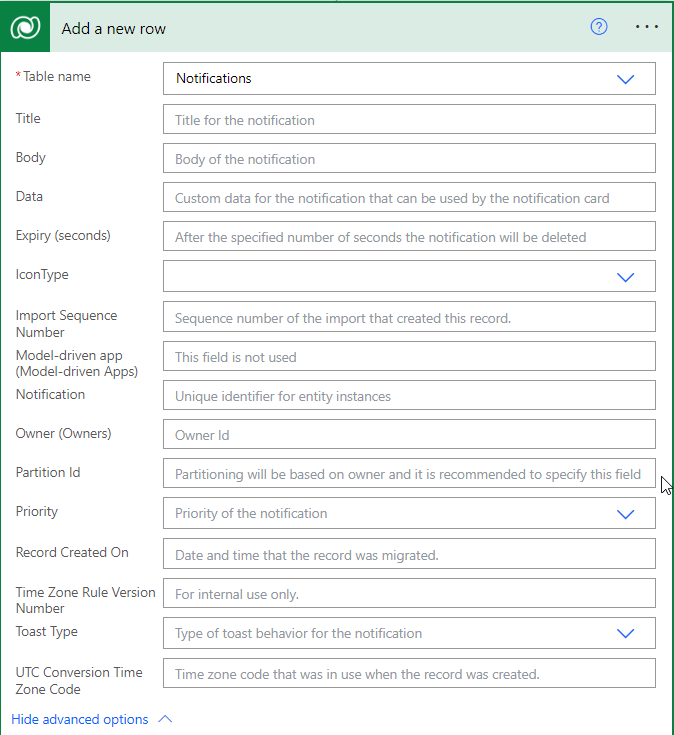
Below are the detailed information about the different parameter to customise the notification.
| Column display | Description |
|---|---|
| Title | The title of the notification. |
| Owner | The user who receives the notification. |
| Body | Details about the notification. |
| IconType | The list of predefined icons. The default value is Info. Available values are (Info, Success, Failure, Warning, Mention, Custom) |
| Toast Type | The list of notification behaviours. The default value is Timed. Available values are (Timed, Hidden) |
| Expiry (seconds) | The number of seconds from when the notification should be deleted if not already dismissed. |
| Data | JSON that’s used for extensibility and parsing richer data into the notification. The maximum length is 5,000 characters. |
Sample Json Data
{
   "data": {
   "actions": [
   {
     "title": "Open Bing",
     "data" : {
          "url": "https://bing.com"
        }
    }
    ]
  }
}
