There is a quiet tax on most Power Automate flows: unnecessary loops.
You retrieve 500 items from SharePoint. You need 12 of them. So you loop through all 500, checking a condition on each one, building a new array one item at a time. The flow works. It’s also doing 488 units of work it didn’t need to do, and every one of those iterations is a billable action execution.
Data operations exist to eliminate that pattern. They handle filtering, reshaping, combining, and transforming arrays as single actions no loops, no conditions, no accumulated variables. Understanding when to reach for each one, and when not to, is one of the clearest performance wins available in the platform.
Here’s each operation explained through the real-world scenario where it earns its place.
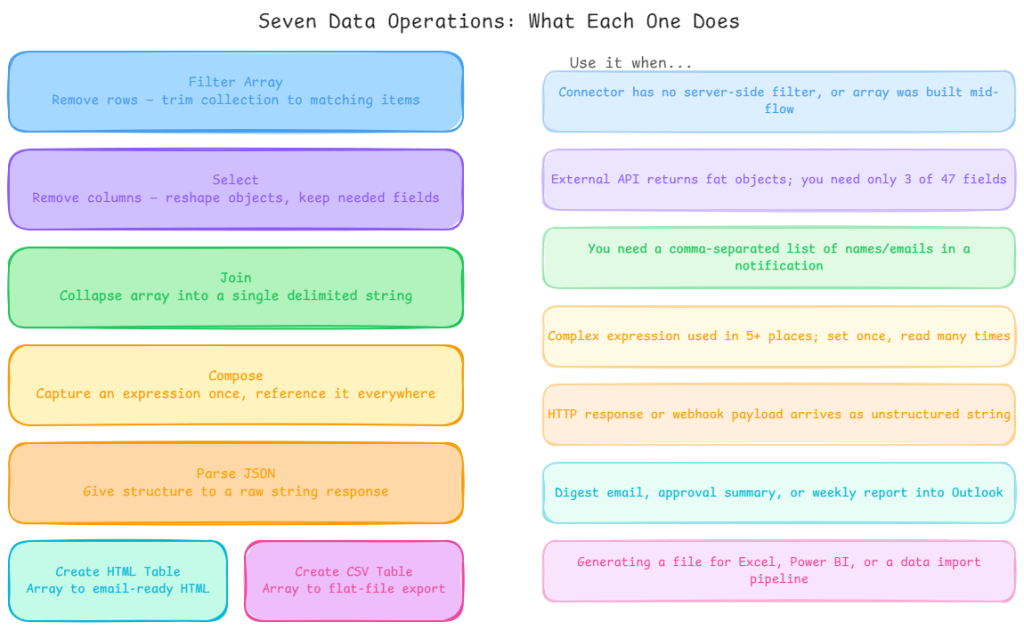
Filter Array trim the dataset before you process it
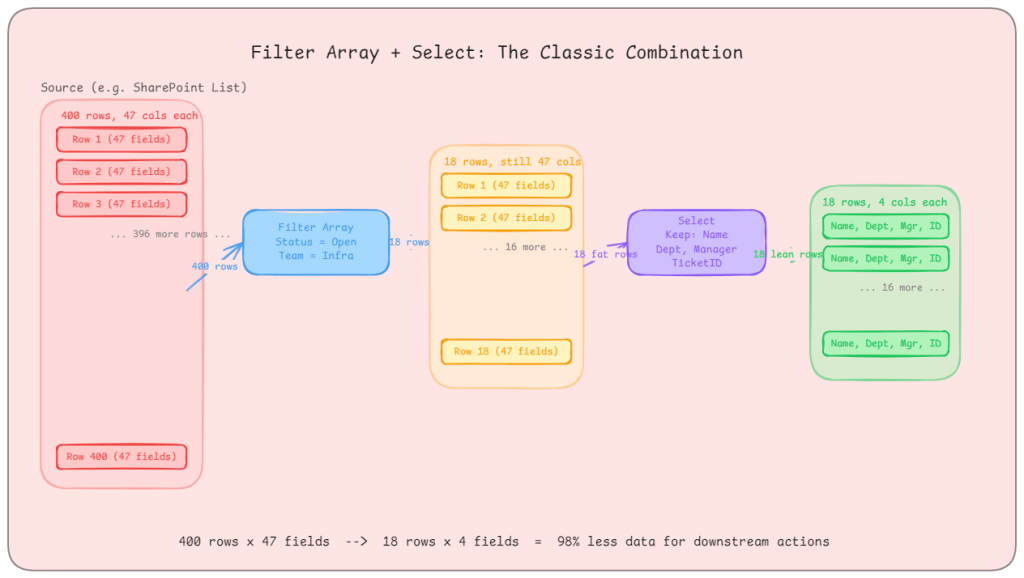
The scenario: Your flow retrieves a list of IT support tickets from a SharePoint list. The list has 400 items. You only care about tickets that are open, assigned to a specific team, and raised in the last 30 days. There are 18 of those.
Without Filter Array, you are looping through 400 items with nested conditions to build a smaller collection. With Filter Array, you pass the full array in and define your condition once: Status equals Open AND Team equals Infrastructure AND Created is greater than [30 days ago]. You get 18 items back. Everything downstream processes 18 items, not 400.
The real-world gotcha: Filter Array runs after the data has been retrieved. If you are pulling from Dataverse, use the built-in Filter rows option on the List Rows action instead. That filters at the query level only the matching rows travel across the wire. Filter Array in your flow is the right tool when your connector doesn’t support server-side filtering, or when you are working with an array that was assembled earlier in the same flow.
What good looks like: Your Filter Array condition uses OData-style expressions. For complex conditions, compose your filter expression separately using the Compose action first, then reference the output. This keeps the Filter Array readable and makes the logic easy to update without unpicking a deeply nested condition builder.
Select reshape the data, not just the volume
The scenario: You are calling an external REST API that returns employee records. Each record has 47 fields: name, employee ID, department, manager, hire date, job grade, cost centre, home address, emergency contacts, and 38 more things you don’t care about. Your flow needs four: name, employee ID, department, and manager email.
Without Select, you carry all 47 fields through every subsequent action. Every Compose, every HTTP call, every adaptive card you populate is working with a bloated object. With Select, you pass the array through once and project only the four fields you need. The output array has lean objects. Everything downstream is faster and easier to read.
Select also lets you rename fields. If the API returns emp_id but your approval system expects employeeId, Select handles the mapping without an intermediate Compose step or variable gymnastics.
The real-world gotcha: Select is a transformation, not a filter. It doesn’t remove rows it removes columns. If you need both (fewer rows and fewer fields), run Filter Array first, then Select. Running Select first on a large array and then Filter Array is valid too, but filtering first reduces the payload that Select has to iterate over.
What good looks like: Use Select to create a clean, documented contract between the messy external world and your internal flow logic. After Select, the objects in your array should look exactly like what your business logic expects. Give the Select output a descriptive name act_CleanEmployeeRecords rather than Select.
Join build readable strings from arrays without loops
The scenario: Your flow has approved an expense report and needs to send a summary email. The approvers are stored as an array of email addresses: ["ali@contoso.com", "beth@contoso.com", "carlos@contoso.com"]. The email body needs to say: “Approved by: ali@contoso.com, beth@contoso.com, carlos@contoso.com.”
Without Join, you are looping through the array and concatenating strings into a variable, tracking commas and spacing manually. With Join, you pass the array and specify the delimiter – , – and get the formatted string in a single action.
The real-world gotcha: Join is for arrays of simple values (strings, numbers). If your array contains objects, Join won’t do what you expect you will get [object Object] repeated. In that case, use Select first to extract the specific field you want (e.g., just the email addresses from an array of user objects), then pass that simple string array into Join.
What good looks like: Join is particularly useful in notification flows approval summaries, digest emails, Teams message payloads. Any time you need to present a list to a human, Join lets you control the delimiter precisely: commas for inline lists, \n for line-separated lists, | for pipe-separated summaries in a table cell.
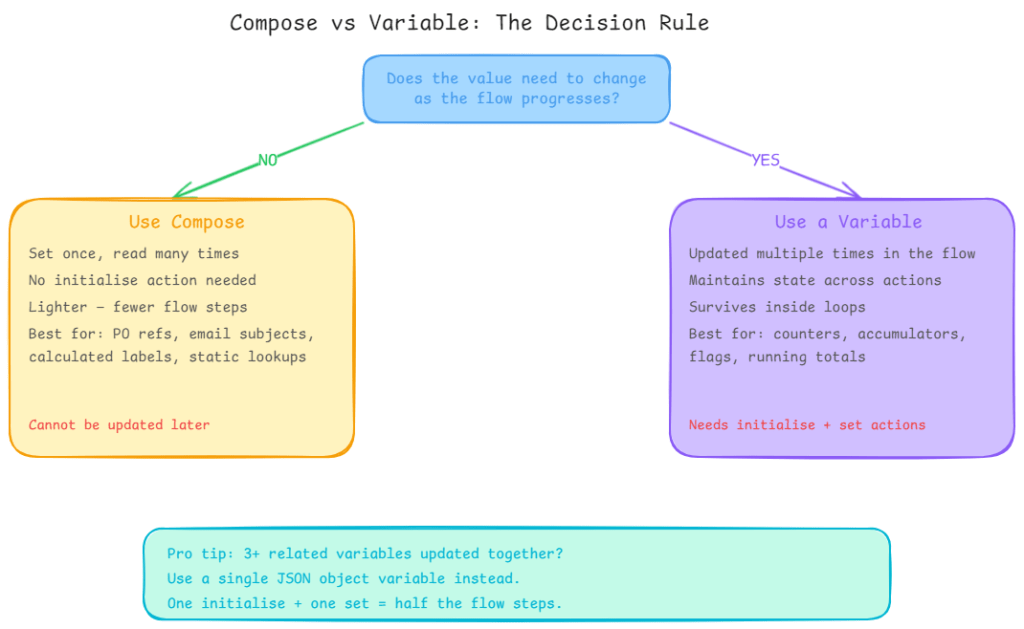
Compose your scratchpad for expressions
The scenario: Your flow calculates a purchase order reference number by combining a department code, a two-digit year, and a sequential number: IT-25-00142. That string gets used in six different places downstream: the subject line, the email body, the SharePoint item title, the Teams notification, the Dataverse record, and the audit log entry.
Without Compose, you’d either repeat that expression six times (maintenance nightmare) or initialise a variable to hold it. Compose is lighter than a variable: no initialise step, no action type switching, no state tracking. You define the expression once in a Compose action, name it clearly (act_BuildPOReference), and reference the output everywhere.
The real-world gotcha: Compose is read-once. Once you have set it, you can’t update it. If a value needs to change as the flow progresses a counter, an accumulating array, a flag that flips based on a condition use a variable. Compose is for values that are calculated once and referenced many times, not for anything dynamic.
What good looks like: Use Compose to break complex expressions into named stages. Instead of one enormous expression buried in an HTTP action body, use three or four Compose actions that build up the final value step by step. Each one has a clear name. If the logic breaks, you can inspect each intermediate output in the run history and pinpoint exactly where it went wrong.
Parse JSON give structure to unstructured responses
The scenario: Your flow calls an external webhook that returns a JSON payload. Power Automate receives it as a raw string. You need to extract the invoiceNumber, totalAmount, and supplierId from inside it. Without Parse JSON, you are writing json(body('HTTP'))?['invoiceNumber'] everywhere and if the schema changes, you hunt through every expression manually.
With Parse JSON, you paste in a sample payload (or point it at a schema), and it produces a structured output with named properties you can reference from the dynamic content picker. Every subsequent action can just pick invoiceNumber from the dropdown rather than writing nested expressions.
The real-world gotcha: Parse JSON validates against the schema you provide. If the incoming payload has a field that doesn’t match the expected type, or a required field is missing, the action fails. In production flows that consume third-party webhooks, define your schema with all fields as optional where possible, and set the additionalProperties flag to allow fields you haven’t explicitly defined. This makes the flow resilient to minor API changes without needing a schema update.
What good looks like: Generate the schema automatically by running the flow once with a real payload, then pasting the output into the “Generate from sample” option. For complex nested objects, parse at the top level first, then use a second Parse JSON if you need to dig into a nested object. Don’t try to express every nested path in one enormous schema.
Create HTML Table and Create CSV Table for human-readable outputs
These two are narrow but useful. Both take an array and format it for consumption outside Power Automate.
Create HTML Table is the right choice when the output is going into an email body. SharePoint lists of pending items, approval queues, weekly digests anything where a human needs to scan a structured list in Outlook or Teams. The table renders inline in the email. Combine it with Select first to ensure only the relevant columns appear, with human-readable column names.
Create CSV Table is the right choice when the output needs to go to Excel, Power BI, a data warehouse import, or any system that accepts flat file input. It produces a properly escaped, header-included CSV string. Combine it with the OneDrive or SharePoint “Create file” action to write a .csv directly to a location.
The real-world gotcha for both: Neither action gives you formatting control. HTML Table produces a basic unstyled table if you need styled HTML, create the HTML manually using a Compose action with a template and the Join action for rows. CSV Table doesn’t support multi-line values cleanly, so if any of your fields contain commas or line breaks, clean them first with a Select that sanitises the content.
Variables vs Compose: the decision that trips people up
The documentation is clear on this, but it still catches people out.
If the value needs to change use a variable. Counters, accumulating arrays, flags, running totals: all variables.
If the value is set once and read many times use Compose. Reference numbers, calculated labels, static lookup values, intermediate expression results: all Compose.
The compound mistake is using variables for everything because “that’s what you’d do in code.” Variables have overhead: they need initialising, they add actions to the run history, and using many of them makes flows harder to read. Compose is lighter and cleaner for anything immutable.
The other compound mistake is storing related values in separate variables when a single JSON object variable would do. If you are initialising varDepartmentCode, varYear, and varSequence separately and updating them in the same section of the flow, consolidate them into a single JSON variable: {"departmentCode": "IT", "year": "25", "sequence": "00142"}. One initialise action, one set action. Half the flow steps, same result.
The decision you should make before any of this
Before reaching for any of these data operations, ask one question: can I filter or select at the source?
If you are using Dataverse, use the Select columns and Filter rows options on the List Rows action. If you are using SharePoint, use an OData filter query on the Get items action. If you are querying SQL, filter in the query itself.
Data operations are powerful, but they run inside your flow on data that’s already been retrieved. Filtering at the source means less data crosses the wire, fewer API calls are consumed, and every data operation downstream has less work to do. Source-level filtering and flow-level data operations aren’t mutually exclusive they are complementary. Use both where they make sense.